
Audio is where most churches get into trouble with the ATEM Mini. The switcher has limited audio inputs, and if you’re running a full sound system with a mixer like a Behringer X32, you need to understand how to properly connect your mixer to the ATEM Mini without creating sync issues or duplicated audio in your stream. This guide walks through the right way to route audio, whether you’re streaming to YouTube or recording locally.
Understanding the ATEM Mini’s Audio Inputs

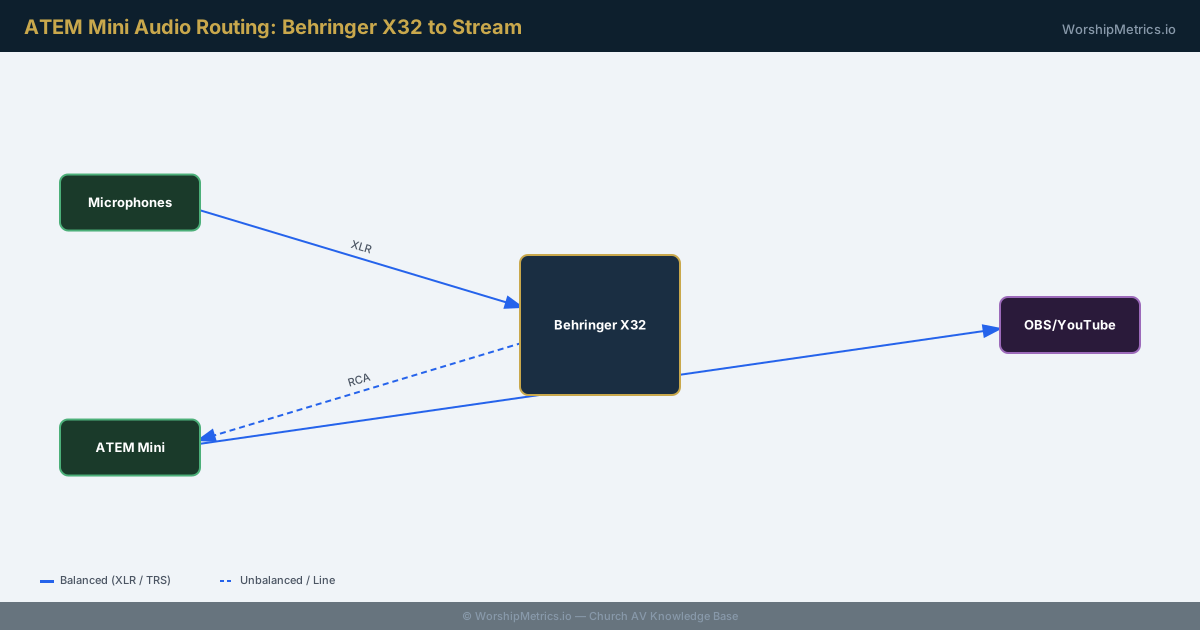
The ATEM Mini has exactly two audio inputs: a 3.5mm stereo jack and an RCA pair. The 3.5mm input is intended for microphone signals or headset mics, while the RCA pair accepts line-level audio. This seems limiting at first, but it’s actually purposeful design—the ATEM Mini expects that you’ll use your main mixer to do most of the audio work, then send a stereo pair (or a summed output) to the switcher.
Think of the ATEM Mini’s audio inputs as a final capture point, not your primary audio console. Your Behringer X32, Yamaha console, or other mixer is where you manage individual microphones, set levels, and create mixes. The ATEM Mini simply passes that mixed audio through to your streaming output. This separation of duties keeps things clean and prevents the common problem where churches end up with audio coming from two different sources at slightly different times.
Connecting Your Mixer to the ATEM Mini via RCA
The RCA audio input on the ATEM Mini is on the back panel next to the HDMI connectors. You’ll need an RCA cable—most audio cable vendors carry these in 10, 25, and 50-foot lengths. From your mixer, you need to identify an output that will give you your final stereo mix. On a Behringer X32, this is typically the “Main L/R” output or a custom aux bus that you’ve set up specifically for streaming.
Run the RCA cable from your mixer’s stereo output directly to the ATEM Mini’s RCA input. Don’t daisy-chain the audio through multiple devices or use the mixer’s output if it’s already going somewhere else—each connection point adds latency and potential for sync issues. The direct path from mixer to ATEM Mini is the cleanest setup.
When you’re configuring your mixer, make sure the output level you’re sending to the ATEM Mini is in the line-level range, not hot mic-level. Most modern mixers default to line-level output, but if you’re pulling from a channel fader set to full volume, you might be over-driving the ATEM Mini’s input. Start by setting your mixer’s output around -6dB to -3dB and watch how it appears in the ATEM Mini’s audio meter.
Avoiding the Double-Audio Problem
Here’s where most churches stumble: they send audio from their mixer to the ATEM Mini for streaming, but they also separately record audio from their mixer or their streaming encoder. This creates a situation where the audio in your YouTube stream is coming from two sources—often at slightly different times due to different processing delays—making it sound like an echo or like the audio is out of sync.
The solution is simple: commit to one audio path. If you’re streaming via the ATEM Mini to your PC, let the ATEM Mini carry the audio from your mixer, and don’t attempt to capture audio separately on your PC. Open ATEM Software Control, navigate to the Audio Mixer tab, and confirm that the RCA input is active and showing green levels during your service. That audio is embedded into the USB video feed going to your PC, so when OBS records your stream, it’s recording the audio that came through the ATEM Mini—perfectly synchronized with the video.
If you’re using a separate streaming encoder or if you need audio for other purposes, create a dedicated stereo output on your mixer just for that purpose, and don’t also route it to the ATEM Mini. This way, each destination (streaming, recording, or whatever else you need) gets its own isolated audio feed, preventing the multiple-audio-source problem.
Mic-Level vs. Line-Level Audio
If you’re using the 3.5mm input on the ATEM Mini for a wireless headset or microphone, understand that this input expects mic-level signal, which is much quieter than line-level. A typical wireless microphone receiver outputs at mic level—you can’t just plug it into a line-level input and expect good results.
However, most churches should route their entire mix through the RCA input, not individual microphones. Your mixer handles all the mic preamps, EQ, and compression that make each vocalist or speaker sound good. The ATEM Mini simply passes that finished mix to your stream.
If you do use the 3.5mm input, keep it isolated. Don’t mix it with your main mixer output—that creates confusion about which audio source is actually live. For example, if you have a guest speaker who’s only got a microphone and no way to plug into your mixer, you could route that mic to the ATEM Mini’s 3.5mm input. But this should be an exception, not your normal workflow.
Audio Levels and Monitoring
In ATEM Software Control, the Audio Mixer tab shows you real-time levels from both audio inputs. You’ll see meters for “Audio In 1” (the RCA input) and “Mic In” (the 3.5mm input). During your service, you want to see the RCA input showing healthy green levels—roughly between -18dB and -6dB, depending on how hot your mixer’s output is running.
Watch for any clipping (red indicators on the meter). If you see red during normal speaking or singing, your mixer’s output is too hot, and you need to reduce it. Conversely, if your audio is barely registering (always below -24dB), increase the output from your mixer or turn up the ATEM Mini’s input gain.
A common mistake is setting your mixer output to maximum and then trying to compensate with the ATEM Mini’s audio controls. This is backwards. Set your mixer’s stereo output to a moderate level that sounds good when you test the stream, then leave it alone. Adjusting levels during a service leads to inconsistent audio quality and potential feedback.
Testing Before Sunday
Before your first live Sunday stream, run an audio test. Have someone speak into the microphone and sing a song while you monitor both the mixer’s levels and the ATEM Mini’s meters. Play back a short test stream to YouTube (unlisted, so it doesn’t go public) and listen on your phone in another room. You’re listening for audio that sounds natural, synchronized with the video, and free from echo or doubling.
If the audio sounds delayed compared to the video, check your RCA cable connection first—a loose connection can cause weird latency issues. If it sounds like there’s a “double” of every word, you’ve got audio coming from two sources, and you need to audit your streaming setup to find the second source and disable it.
Summing Your Setup
The rule is simple: mixer’s stereo output goes to ATEM Mini’s RCA input, and that’s your audio for streaming. Everything else is just the ATEM Mini passing that audio through to your streaming encoder (like OBS). Don’t send audio to multiple places, don’t route individual mics to the switcher, and don’t try to mix audio on the ATEM Mini—use the ATEM Mini to pass audio through, and let your mixer do what mixers do best.
Once you’ve got this dialed in, you’ll notice that your streams sound professional. Audio is synchronized, levels are consistent, and everything feels like one cohesive broadcast rather than a patchwork of different audio sources. That’s what proper audio routing gets you.